Explorations: Landing on the Moon
The Orbiter Space Simulator: An Appreciation
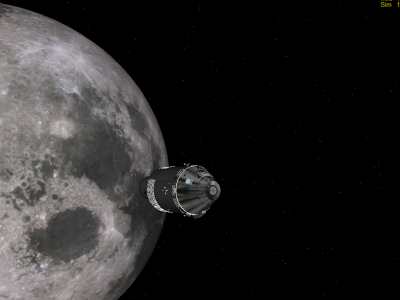
Apollo 11 CSM on the trip back from the moon
This appreciation of Orbiter was written in 2006, but remains up-to-date as of December 2009. Ironically, I discovered Orbiter just as development slowed down. Over the next three years, Orbiter did not release any new versions, and NASSP released a progression of betas. You'll see that, even in 2006, I had to search around a bit, as many people had dropped out of the community and their information had grown out of date. It's hard to keep a community-driven project going.
Introduction
The first decade of the twenty-first century is an exciting time to be a space nut. Not only is the International Space Station whizzing overhead constantly, but China has launched men into orbit, and private spaceflight is finally getting off the ground. But even this frenzy of activity does not begin to approach the excitement of the 1960s, when the Apollo program launched men to the moon. Fortunately, we can relive and reenact the heady days of the Space Race through another technological wonder — the computer.
In 1995, director-producer Ron Howard introduced a whole new generation to the excitement of the Apollo program with his box-office smash Apollo 13, starring self-avowed space nut Tom Hanks as Commander Jim Lovell. Avoiding the use of NASA stock footage, the effects crew at Digital Domain used nascent digital techniques -- Computer-Generated Imagery (CGI) and computer compositing -- to enhance traditional effects techniques of photographing spacecraft miniatures.
Three years later, Tom Hanks convinced HBO to invest in an excellent 12-hour miniseries on the Apollo programs, From the Earth to the Moon, which received a larger total budget than the earlier motion picture. Digital effects were used more extensively on the miniseries, which combined CGI effects with color-corrected stock footage for a docudrama look. Besides, Moore's Law meant that four times as much computer power had become available since the film.
Well, time continues marching on, and the expensive Silicon Graphics workstations of yesteryear now pale in comparison with the computers sitting on your desk. In 2000, Dr. Martin Schweiger of University College London began work on a 3D space simulator called Orbiter. Over the years, he has maintained it, added features, and most importantly, developed an architecture that allows for community-contributed add-ons. In fact, even the core feature of sound effects — launch rumbles, spacecraft ambient noise, communications chatter — is implemented as an add-on, written by Orbiter enthusiast Dan Steph.
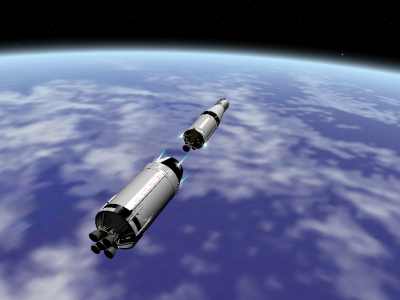
Orbiter screenshot. T+0:09:20. The expended Saturn V second stage separates. The small jets of flame are the ullage thrusters.
The beauty of the simulator is that it provides a much deeper understanding and appreciation of the technology that got Apollo to the moon. I've been a space nut since I was six years old, when my father bought me a copy of The Omni Space Almanac. I've read about the technology in numerous books and articles, but no matter how exciting those descriptions were, they nevertheless remained words on paper. Orbiter, in contrast, provides the visceral thrill of being able to (virtually) flip the switches and push the keys on the DSKY, then actually see them take effect on the spacecraft. Spaceflight concepts that are usually difficult to understand become second-nature after they've been tried out in the simulator. Perplexing orbital mechanics that had previously been brain-twisters of 3D geometry now become intuitively obvious.
Microsoft Flight Simulator virtually buckles you in the pilot seat without having to shell out $100 an hour to rent a Cessna. Orbiter has taken the trail blazed by the long-since discontinued Microsoft Space Simulator (1994), and paved it into a multi-lane expressway. With Orbiter and its add-ons, you can (virtually) strap yourself into the astronaut's couch for $20 million less than it costs to fly along on a Soyuz mission to the International Space Station. In some ways, it's better. You can get a flying license and actually control a plane, but even the billionaire space tourists are mostly just sightseeing. This is truly a geeky thrill that will not be available for decades to come.
Rocket Science
To fly to the moon in Orbiter, you first take a crash course in orbital mechanics. Fortunately, Bruce Irving's superb PDF tutorial Go Play in Space guides you through your first baby steps in a spacecraft. It walks you through downloading, setting up, and configuring the simulator, and then takes you through a series of gently-sloped lessons. With every command spelled out by the keystroke, you can learn the simulator's keyboard shortcuts at the same time as you're drilling the orbital mechanics into your head.
The tutorial is 136 pages long, and needs every page. There is a good reason why "rocket science" is American English slang for "extremely hard problem." (See the montage of rockets blowing up in the first great film about the Space Race, The Right Stuff). These days, "brain surgery" has replaced "rocket science" in the lexicon, but you must still know your ellipses, apoapses, periapses, delta-vees, progrades, retrogrades, orbit normals, orbit anti-normals, inclinations, and more.
The tutorial is done in the Delta Glider and the Shuttle-A, imaginary spacecraft from our bright future in space. These hypothetical ships carry plenty of fuel, allowing you to make huge mistakes and still make it back to base. Real spacecraft, even large ones such as the Space Shuttle, are engineered to provide a certain level of capability for the lowest weight, leaving very little margin for error. That would make for too much of a checklist experience in a simulator, hence the future spacecraft.
Begin with pitch, roll, and yaw in space. Then progress to orbit-changing maneuvers — raising your apoapsis, changing your inclination, etc. Become handy at non-atmospheric planetary maneuvers by taking a spin around a moon base. It feels different from flying an airplane or even a helicopter — although the hover engine provides lift like a helicopter rotor, the lack of drag means that inertia still dominates in the horizontal directions. Finally, fly to the moon and back, using an Orbiter add-on to calculate the proper injection burns and capture orbits.
This may sound like it's duplicating the Apollo flights, but it's actually just giving the broad outlines of spaceflight. You will need these concepts for any flight to the moon. The Apollo flights, on the other hand, will be realistic to within minutes of the actual missions. There are a bewildering array of switches on photorealistic instrument panels, and you'll have enough worries trying to find the right switch. Intricate maneuvers must be performed very precisely to be successful — LM extraction, TLI, lunar orbit insertion, rendezvous and docking, reentry alignment.
Orientation and Mood-Setting
But before stepping (virtual) foot inside the Apollo command module, it is helpful to get an overview of where things are. Unless you live near a space center where you can sit inside a mockup, stock up on Apollo-related DVDs.
If you've read this far in this article, you're probably enough of a space enthusiast to have seen Apollo 13. As a film targeted at general audiences, it concentrates more on human relationships than on technology, and contains some notable technical inaccuracies (as Commander Jim Lovell points out in the DVD commentary track). But the shots of the instrument panel are quite informative. Watch the circular engine lights during launch, and note what happens when one of them shuts down earlier than planned. Observe the actors as they enter commands into the Apollo Guidance Computer, and read the seven-segment numeric display. Take a glance at all the gauges as they change values — they'll help you to imagine gauges in your head as you look at the less-dimensional gauges in the Orbiter simulator.
But Apollo 13 only takes you so far. The mission never actually touched down on the moon, so we never see the landing sequence. For that, turn to the miniseries From the Earth to the Moon. Not only is it longer, but it's also much geekier, diving into lots of technical detail. Undoubtedly this is due to Tom Hanks' influence as producer, and also because the audience for a 12-part miniseries is more technically oriented than for a 2-hour mass-release film.
In the Apollo 8 episode, you'll see the complete sequence of events for a lunar orbital flight — note how the lunar orbit insertion and trans-earth injection occur on the far side of the moon. Having worked through the Orbiter tutorial, you'll now know why a Hohmann transfer can only be done on the far side, while the crew is isolated and out of communication with Mission Control. The Spider episode (tangentially, Apollo 9 and 10) lays out the principles behind the design of the Lunar Module. Pay attention to the segment where Tom Kelly, the head of Grumman's LM program, accepts a weight-saving but counterintuitive control layout by reasoning, "Astronauts are smart." So are you, because you too will have to make spatial transformations in your head, maneuvering the LM while all the controls are rotated by 90 degrees.
In the Apollo 11 episode, the hair-raising first manned landing on the moon is reenacted in great detail, with many close-ups of switches, dials, and gauges. Neil Armstrong sees that the LM is heading for a boulder field, and takes manual control of the spacecraft. Note how the lunar module maneuvers forwards and backwards: not with thrusters, but by pitching and rolling the whole craft. Buzz is shown looking at the surface motion indicator (Oh, so that's why he kept calling out those numbers in those lunar landing snippets that we saw in Grolier's Multimedia Encyclopedia). Finally, he then calls out "Contact light", as the camera shoots a close-up of that lovely blue light that signals the completion of one of mankind's earliest dreams.
Later episodes focus more on the human element of the Apollo Program, exploring the news frenzy of Apollo 13, Alan Shepard's ear illness, the geological training given to the astronauts, and the cost inflicted by the Program on the astronauts' wives. There is also a nifty tie-in between space and film-making, with reenactments of the filming of George Méliès' pioneering silent film La Voyage dans la Lune (The Trip to the Moon).
The first six episodes focus more on the technology, and provide an overview of the spacecraft you'll be "flying." However, you will not need to know how to trick the Apollo Guidance Computer when it hits an error condition, as happened during the Apollo 14 landing. Nor do you need to identify rocks, or set up equipment on the surface, or hit a golf ball "miles and miles and miles" — there's only a very limited set of activities available in the simulation when you're on the surface. (After all, Orbiter simulates the spacecraft. Flight Simulator doesn't recreate the airport terminal experience either.)
Simulating Apollo
The NASSP Project Apollo add-on is an open-source project that has absorbed many other projects to produce an astoundingly comprehensive and high-quality Orbiter simulation of the Apollo missions. It includes highly-detailed 3D models for the spacecraft, as well as control panels for the Command and Lunar Modules, featuring hundreds of switches, dials, and gauges. Plus, several functions of the Apollo Guidance Computer are available, including fully automatic launch and precise control of Trans-Lunar Injection. Audio clips from the real Apollo missions add ambiance, though they do not serve much of a simulation function since the Apollo program used feet and miles while Orbiter displays units in the metric system.
Orbiter is an interesting development model. One man controls the closed-source core code, but a highly modular architecture allows for a multitude of plugins. Of course, much of the core code involves numerical analysis, which must be done accurately to avoid introducing errors into spacecraft motions. Add-ons perform many basic functions, such as sound, flight and orbit planning, and computer guidance.
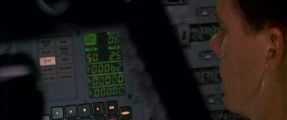
Frame capture from Apollo 13 DVD. This scene takes place just after the accident, as the command module is being powered down. The display on the AGC DSKY mockup is accurate. Program 6 is G&N Power Down, verb 50 is "Please perform" and noun 25 is "checklist."
Project Apollo is among the most polished of the available spacecraft addons, although it still has many quirks. For example, you must click on the text label to activate buttons; clicking on the side of the button will not work. The hot zone for switches is similarly limited. But the NASSP people are not standing still. Version after version rolls out, each better than before. (in the archives, you can see that the panels once had half as many instruments). The sheer amount of detail greatly increases the realism of the simulation. Just like it is impossible to properly fly an A380 in Flight Simulator when using a Cessna control panel, it is jarring to fly Yuri Gagarin's Vostok One with the default modern glass-cockpit controls. Many of the other Orbiter add-ons are designed for splashy exterior screenshots. NASSP looks good from the outside and the inside.
There is even a side project to run the actual Apollo Guidance
Computer programs inside a virtual machine that emulates the AGC
hardware. 
The AGC DSKY in Orbiter. Program 11, verb 16 monitors the launch
with a 2 Hz update rate, and noun 62 displays delta-v, downrange
distance, and elapsed time, respectively. In Orbiter these values are in
metric units, though the real AGC used feet and nautical
miles. (The standard NASSP simulates the
functions of the computer, using modern programming languages.)
The programs are compiled from source code made available by the MIT
Instrumentation Laboratory (now Draper Labs), where the AGC software was
originally developed. [MIT AGC History Project]
Such is the power of Moore's Law. In Apollo 13, Tom Hanks proudly describes a computer that fits in a single room and has a megabyte of memory. Film critic Roger Ebert remarked that he was typing his review on a more powerful computer than the one that guided a spacecraft to the moon. Well, now, we have so much computer power that we can calculate trajectories, render realistic 1280x1024 images of the spacecraft at over 25 fps, and emulate every hardware function of the Apollo Guidance Computer, fast enough for the original software to run in real time. That's progress.
The problem with NASSP, as with many other open-source projects, is that very few people want to write documentation. As a result, the documentation is very poorly organized and sometimes quite skeletal (in one case, the only documentation on how to jettison the SIV-B booster stage is a marked-up screenshot). Diagrams of the control panel, checklists for operation, and detailed instructions for operating the guidance computer are all available, but each is in a separate PDF.
Fortunately, people have written tutorials for getting to the moon and back in NASSP. After going through Bruce Irving's tutorial, you will have already done the trip in a super-capable fictional spacecraft. You will now be trying it for the first time in realistic spacecraft with severe propellant limitations. The best tutorial I've found for this level is Matthias Holzer's. Unfortunately, that tutorial has not been updated for some time, does not give all the keystrokes, and many that it does give have changed in newer versions of add-ons. I also could not reach the author.
The tutorial also makes use of a Lunar Landing MFD add-on that I could not locate, despite a large number of tantalizing clues that all turned out to be dead links. Forum posts also indicate that the LunarLandingMFD does not run on the current version of Orbiter, that it was a matter of a dozen lines of code, but that the lack of a clear distribution license for the original code has kept the fix from being made available. The author of the Lunar Landing MFD had dropped out of the community as of 2006, but found this web page in 2009, and emailed me to say that he had no objection to noncommercial use. Unfortunately, I don’t have a copy of the source code, and I couldn’t get back in touch with him.
So, as you can see, NASSP Project Apollo is not exactly an accessible add-on, despite its great detail and wealth of features. But I worked through it and jotted down a list of notes that can smooth your path.
Lift-Off and the Clock is Running!
At this point, having worked through the Go Play in Space tutorial, you should have a working Orbiter install. As noted above, the best tutorial is the Matthias Holzer's:
The tutorial gives a list of components needed to fly Orbiter, but it points to old versions from 2004. Here are the correct links for the most up-to-date versions:
- Orbiter has been upgraded, but still can be found at http://orbit.medphys.ucl.ac.uk/. I used Orbiter 2006.
- OrbiterSound has also been upgraded but is still located at http://orbiter.dansteph.com/
- Project Apollo - NASSP and NEP should not be downloaded from the locations given in the tutorial. Instead, go directly to the Sourceforge site for the most authoritative version: http://sourceforge.net/project/showfiles.php?group_id=129726. Get all Project Apollo files and patches, along with the NASSP Enhancement Pack. I performed this using version 6.4.3, so there may be glitches if you use one of the 7.0 betas. Virtual Apollo is the virtualized AGC discussed above — you won't be using it for the mission.
- Not mentioned, but very much necessary, is the LandMFD which substitutes for the now-disappeared Lunar Landing MFD. Ironically, it is also in quasi-limbo, but for the present may be obtained at: http://www.aovi93.dsl.pipex.com/others_addons/LandMFD0514.zip. The NEP readme says that "Latest updated LunarLandingMFD courtesy of Tjohns." Don't believe it — there are no DLL files in the package, so that's a legacy of an earlier time.
If you find that any of these links don't work, please send me email! (My email address at the “About Me” link at the top-right of this page.) Now, do a whole bunch of unzipping and file overwriting, and you'll be all set to fly to the moon. All together, it's around half a gigabyte in size.
I recommend saving early and often. You will need those saved games because you often have only one chance at performing a certain maneuver. Orbiter sometimes crashes when loading up a saved state, but fortunately this seems to be non-deterministic — after two or three tries, you will eventually hit a stable state.
I recommend using another computer for cross-referencing against the
documentation files listed below. This is a good use for a laptop; think
of it as a checklist binder. Orbiter is processor-intensive and tends to
become unstable when you flip out of full-screen mode, while running in
windowed mode removes some of the immersive effect of being inside an
Apollo capsule. Also, the sound cuts in and out with task switches,
which is rather annoying. 
Orbiter screenshot. T+3 hours, racing outward at 25000 miles/hour.
The CSM/LM stack undocks from the S-IVB third stage. As you can see, it's
around noon in Florida, since nearly the whole disc is illuminated.
Apollo 11 launched at 9:32a Eastern Daylight Time.
- Doc\Orbiter.pdf. The Orbiter manual. Mr. Holzer's tutorial makes use of some commands that you will not have learned yet if you've just finished Mr. Irving's tutorial.
- Doc\Project Apollo - NASSP\Flying Saturn V.pdf. Gives keystroke-accurate directions for using the Apollo Guidance Computer. Now you'll know what it means when it says "Enter verb X noun Y value Z." (Verb XX Noun YY Enter +ZZZZZ Prog, and it won't work if you make a mistake)
- The CSM and LM instrument panel manual and checklists (four PDFs in all) from Doc\Project Apollo - NASSP. The type on the panels is small — which is why you'll need to refer to the documentation. The tutorial will often say something like: Turn on the RCS. But how? The checklists will tell you exactly which dozen switches to flip to turn on the RCS, descent, and ascent stages.
- Doc\Project Apollo - NASSP\Separation Switches.jpg. Make sure you don't hit the wrong sep switch. Fortunately, this is made easier by the nice large arrows in the screenshot.
- Doc\TransXmanualv3.pdf. The tutorial doesn't give keystroke-accurate steps for using TransX to set up your lunar trajectory, so this time you really have to read the manual. (Indeed, Mr. Holzer had it worse — he wrote the tutorial on a German keyboard so the mnemonics didn't line up with the keycaps).
- LandMFD\readme.txt. This will explain how to use the LandMFD substitute for the Lunar Landing MFD.
Of course, the tutorial should be open. Now, with these files open, you
will no longer be puzzled when the tutorial refers to something in an
unclear way, or when you don't remember how to do something. Set the sim
to 0.1x time, go to the other computer, and search for the appropriate
text in the PDF. But there are some other issues that forced me to spend
significant amounts of time searching the manuals for answers. Minor
typographical and filename issues aside (e.g.,
flying-saturn-v.pdf is now called Flying Saturn V.pdf),
here are the main issues that I puzzled over. I hope they help to smooth
your flight: 
Frame capture from Apollo 14 episode of From the Earth to the
Moon. Alan Shephard is punching instructions into the DSKY at
bottom center.
- p. 4: "... the SIVB will continue to fire the ullage thrusters until their fuel is depleted." If you remember this, then you may be surprised when the ullage thrusters fire just prior to TLI burn, or assume that the main engine failed to ignite. Don't worry. In reality, the ullage fuel is not depleted, and the ullage thrusters are just firing to settle the tanks. Your burn will proceed on schedule after several seconds.
- p. 5: My numbers are somewhat different. Prograde vel: 3.144k, dt 40418.6811, maj. rad. 1.738M, focus PED 1.739. I could not get it all the way down to 1.700M. Maybe you'll have more luck, or maybe this is the result of the more accurate numerical calculations in later versions of the MFD.
- p. 7: You will not see a countdown to TLI if you follow these instructions. Instead, refer to the TLI instructions in the Saturn V PDF file to run AGC program 16.
- p. 8: Do not use the docking panel view to dock. My AMD XP 3000+ machine, with a 128MB NVidia graphics card, slowed down to 1 fps. I suspect this may be caused by CPU-intensive software scaling of an odd resolution in the panel — remember that software scaling is slow, and panel updates are taking place in real time.
- p. 9: LM power is a 3-way switch. Don't worry about it. It's not crucial, and you can always try the third option if it doesn't work.
- p. 12: A distinctly Eastern European voice (one of the NASSP developers, probably) will announce the burn at about 60:57 mission time, i.e., closer to 61 hours than to the 60 hours given in the tutorial.
- p. 13: If you press Ctrl-Alt-R to change orbit reference, it won't
work. The proper keystroke is Ctrl-R.
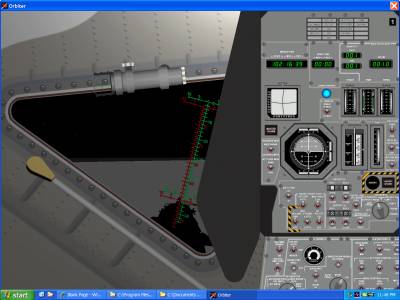
Orbiter running in a window in Windows XP. This is the LM control panel — notice the illuminated blue contact light, and through the window, the shadow of the LM on the moon's surface. Compare with recreated LM control panel above. The Orbiter panel is very large and scrolls, so only the top of the commander's panel is in view. - p. 17: Activate LandMFD with Shift-8. Refer to the readme for usage instructions. Things may go a little crazy when it is disengaged. Lunar landing may be a hair-raising experience — just try it enough times to become familiar with the controls, then fly it down on instinct. Don't forget to save before engaging the LandMFD.
- p. 18: Turning off HVR direct could probably be accomplished instead by turning Engine Arm OFF. In any case, if you blast off accidentally, you can just load the saved game.
- p. 19: I couldn't get Buzz onto the moon. Let me know if you figure it out. In hitting random keystrokes, I did manage to expose a bug where two Neils step onto the moon, and the first one just won't get back into the lunar module. Evidently the state machine has not been thoroughly tested.
- p. 20: Don't follow the tutorial where it says to hit STAGING to launch. Use the ascent checklist to launch from the moon. The older LM panel looks considerably different and less complicated than the current version.
- p. 21: Synchronize MFD is not Shift-Y, it's Shift-Z.
- p. 25: TEI is very tricky. I could not get numbers as good as in the tutorial, and relied on mid-course corrections to get closer to the target numbers.
Good luck, save often, and have fun! For some reason, I felt a great sense of accomplishment when the parachutes came out and the command module splashed into the Pacific Ocean. Maybe it's because of all the manuals I had to flip through — a small sample of the paperwork experienced by the real astronauts during the mission.
Lessons Learned
It took a lot of documents to successfully complete the mission: the manual, the tutorial, the patchy NASSP documentation, the Apollo walkthrough, the random webpages and forum posts. When put together, they taught me a great deal about the science and engineering of the Apollo program. Often, I knew these facts and principles already, or should've known them, but never took them completely to heart until I went through the whole trip to the moon and back in Orbiter. For example:
- Many sources, even technically-reliable sources, casually talk about escape velocity, and state that Apollo 8 was the first time that humans travelled at escape velocity. But going to the moon does not require accelerating up to escape velocity. After all, the whole point of a free-return trajectory is that you're still in orbit around the earth, albeit a highly elliptical orbit that extends to the orbit of the moon. In order to avoid truly escaping Earth's gravity and going into orbit around the sun, you must remain below escape velocity.
- Landing on the moon is really tricky! The LM is not at all easy to fly. Conceptually, the hover engine acts as a helicopter rotor would in atmosphere. But pitch/roll/yaw are still controlled with reaction-control thrusters, and there is no atmosphere to retard motion. A roll, once started, will continue until you arrest it by thrusting against the roll, or until the LM is upside down and you're accelerating towards a crash on the surface. Marrying the two modes of thinking — gravitational and non-atmospheric — takes some getting used to. Even when that mental barrier has been breached, the LM is severely fuel-constrained and you have to be nearly perfect to successfully land at all. Remember that Eagle had less than thirty seconds of fuel remaining when it touched down! This explains another puzzle: why the astronauts kept training in those jet-powered lunar-landing simulators, even though they were so dangerous (Neil Armstrong almost got killed in one). This is such a critical part of the mission that the astronauts must drill until it becomes instinctual.
- The reentry path had to be set while still very far out from earth! Very apt indeed are the newscasters' analogies of basket balls and the width of a human hair. I knew this fact dispassionately, but I only realized after playing the game just how helpless the command-module was, totally unable to affect its reentry path. Just a few degrees off optimal, and the astronauts will be either burnt or asphyxiated. Much more dangerous than a Gemini mission, which was in low-earth orbit. This explains why NASA devoted an entire unmanned Saturn IB launch to testing reentry.

"That's one small step for [a] man, one giant leap for mankind." Note the long shadows cast, as the sun is low in the sky. Orbiter's terrain-handling is still suboptimal, which is why the LM appears to float two meters above the surface.
Further Exploration
Orbiter follows the Microsoft Flight Simulator model of development — main program from one authoritative source, plus a jumble of third-party add-ons of inconsistent quality. There is an active Orbiter community. The Orbiter home page contains links to some very popular related sites: http://orbit.medphys.ucl.ac.uk/links.html.
For more of the early NASA programs, the Project Mercury add-on is approaching Project Apollo in quality and comprehensiveness. In fact, it is a more complete simulation than Apollo, if only because Mercury is much simpler than Apollo — for example, you can fly a mission fully on automatic. Mercury requires a scenery package to be installed, overwriting Cape Canaveral with its 1962 configuration.
The Project Gemini add-on, however, is the neglected middle-child and lags both Mercury and Apollo. Many aspects of the missions are present, including an Agena that can be controlled with computer commands. But the add-on package is hampered by a simplistic control panel, with only a few active instruments layered on top of a static photograph. A far cry from the complex and detailed Apollo control panel that is rendered from a detailed vector source. This is a real shame, because Gemini included some neat maneuvers that were missing from Mercury: rendezvous, docking, Agena boosting, spacewalks, etc.
The Space Shuttle and International Space Station are present in the default installation of Orbiter, but most people recommend using the Shuttle Fleet add-ons with the autopilot. There are many Russian spacecraft available [OrbitMods], from the Vostok to the Soyuz to the Buran space shuttle, but many of these lack good panels. Panels are very difficult to get right, since they must not only look good but also function properly. Spacecraft can be designed by eye, with some technical data fudged in, since very few people know how they really handle in flight. But an incomplete panel sticks out on even a cursory inspection.
And, of course, there are a variety of futuristic spacecraft. Some are from the movies, 2001: A Space Odyssey, Star Wars, and Star Trek being quite popular. Since Orbiter uses Newtonian mechanics and does not model relativistic effects, you can actually exceed the speed of light in these purportedly faster-than-light ships. Of course, there are also more physically-realistic spacecraft, like the Delta Glider.
Conclusion
Bruce Irving's blog, Music of the Spheres, contains various musings on Orbiter and virtual spaceflight. Read his blogger profile for an idea of what type of person is interested in this sort of stuff (an optical engineer from Massachusetts). Good company to be in. Of course, there are some people who look at this as just a game, like playing a combat flight simulator with unlimited ammunition and unlimited fuel. That's fine, but Orbiter has more to offer than just entertainment. Orbiter also has the ability to teach and inform.
What I appreciated most from playing Orbiter was finally getting an intuitive understanding all the engineering constraints and trade-offs involved in designing and executing the Apollo moon missions. It is not possible to appreciate flight merely by reading about it or watching videos, nor is it possible to fully grasp the complexities of space flight by looking at diagrams or animations of orbital mechanics. You have to try it for yourself.